How to Reset Chevy Captiva TPMS Low Tire Pressure Light (2012-2018)
Last Updated on January 8, 2020 by Christ
How to Reset Chevy Captiva TPMS Low Tire Pressure Light (2012-2018) – The Chevrolet Captiva is an SUV Segment D, produced by former Korean manufacturer Daewoo, and marketed worldwide under the Chevrolet brand after the acquisition of Daewoo by General Motors. His line is borrowed from the Chevrolet S3X prototype, presented in 2004, the last of the acquisition phase of the Korean manufacturer by GM. However, in Korea, it has been marketed under the Daewoo brand until 2011 under the name of Daewoo Windstorm, when, in addition to ‘arrival of the facelift, the Daewoo brand in Korea, is replaced with the global Chevrolet brand.
It is also sold by GM’s Australian subsidiary Holden as Holden Captiva. The Captiva is equipped with two petrol units and one diesel. The two gasoline is a 4 cylinder in-line 2405cm³ able to develop 136cv, and a 6-cylinder V 3195 cm³ able to develop 227 hp. The diesel before the makeover is designed in partnership with the Italian VM Motori, but produced in South Korea and is a 4-cylinder in-line 1991 cc, capable of 150 hp.

How to Reset Chevy Captiva TPMS Low Tire Pressure Light (2012-2018):
Time needed: 17 minutes
To relearn or reset the Tire Pressure Monitoring System (TPMS) sensor on your 2012 2013 2014 2015 2016 2017 2018 Chevy Captiva you must have a TPMS relearn tool and follow these steps:
- Stop the vehicle in a safe place and turn the engine switch off and engage the parking brake.
- Turn the ignition to the ON position without starting the engine.
- Press and hold unlock and lock buttons on the Remote Keyless Entry (RKE) transmitter until horn sounds
- If your vehicle does not have the Remote Keyless Entry (RKE) transmitter
Press the DIC MENU button
Scroll up and select “Tire Pressure Menu”
Press the SET/CLR button
When a message requesting acceptance of the process appears, press the SET/CLR button again to confirm.
The horn sounds twice to signal the receiver is in relearn mode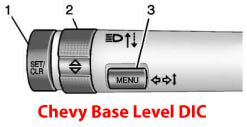
- Starting from the driver’s side front tire, place the relearn tool against the tire sidewall, near the valve stem. Then press the button to activate the TPMS sensor.
- Repeat the procedure on the right-front tire, the right rear tire, and the last one left rear tire.
- A horn chirp confirms that the sensor identification code has been matched to this tire and wheel position.
- Turn the ignition off and start the engine to verify the indicator has been reset.
For more details, please watch the following video:
This tutorial is based on the Chevrolet owner’s manual. This procedure should be work on the latest generation of Chevy Captiva (2012 2013 2014 2015 2016 2017 2018 model years). Hopefully, the article How to Reset Chevy Captiva TPMS Low Tire Pressure Light (2012-2018) useful for you. Good Luck!
Leave a Reply